Defect Opener User Manual
Automated Defect Opener User Manual
Step 1: Ensure that you have the QC open and your New Defect window open, non-maximized

Step 2: Install and then launch the program
You may kill the program anytime with Cancel / Esc, else you may Pause it with Pause button. With Pause, just ensure you do not move the cursor from the original position so that it will begin again, when un-paused, successfully.

Defect opening automatic script.
Welcome to Roy's defect opener Version 2.5 Covered by the GNU open source license included with this installation. I will ask you for a few inputs and then let the magic begin. You may press ESC to exit, Pause to Pause the script
Step3: Follow the onscreen instructions.
NOTE: You have to fill in the needed values VERY ACCURATELY else my program is not responsible for your typo / errors and anything that may change in QC is beyond my control but I will quickly supply hotfixes for QC changes once I am notified via email.
Some input values are checked when it is being input, however it does not differentiate between capitalized and non-capitalized entries, so please be aware of this limitation.
Step 4: Put in the release. Default is R11. Currently it is limited to R11 & R12:
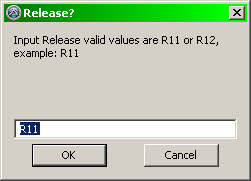
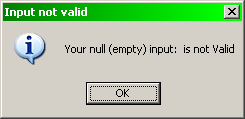
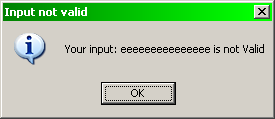
NOTE: At any input boxes / prompts, if you enter either an empty or incorrect value my program will throw a Null / Invalid Input error and return you to the input again until you put acceptable values, else press cancel to kill the script:
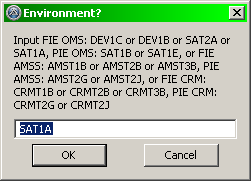
Step 5: Type in the environment very carefully, and in CAPITALS, default is SAT1A, for now limited to
FIE OMS: DEV1B DEV1C or SAT2A or SAT1A,
FIE AMSS: AMST1B or AMST2B or AMST3B,
FIE CRM: CRMT1B or CRMT2B or CRMT3B,
PIE OMS: SAT1B or SAT1E, or
PIE AMSS: AMST2G or AMST2J, or
PIE CRM: CRMT2G or CRMT2J
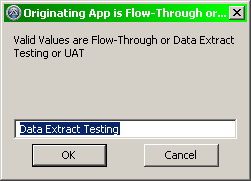
Step 6: type in the Originating Application. Default is Data Extract Testing
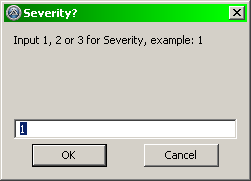
Step 7: Type in the Severity just the number, default is 1
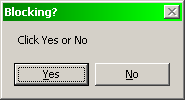
Step 8: Click YES or NO if the Defect / Issue is Blocking
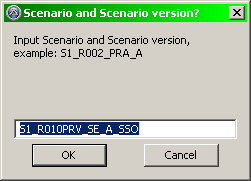
Step 9: Type in your scenario name, default is S1_R010PRV_SE_A_SSO.
NOTE: Here there is no promise what you have on BSP / Data sheet will match what is in QC, I have my program to catch errors thrown from QC later on.
On a performance level, I noticed that upon the 1st run, my program is not fast enough to catch these errors, I may suggest doing a warm up regression of a dummy defect filling and then it will be ready for actual future runs.
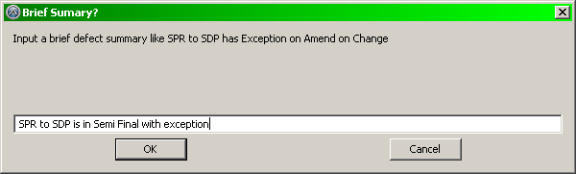
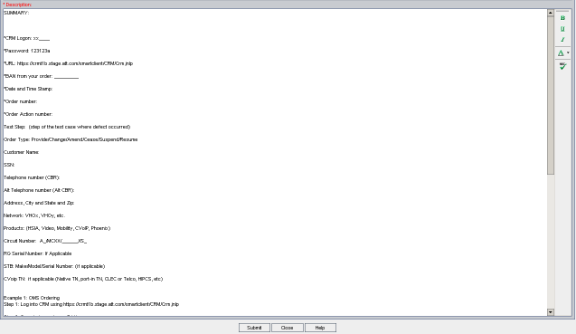
Step 10: Type in the brief Summary which will appear in the title of your defect. My program will do the pre-population of the title (FIE _ ) so DO NOT include that pre-population.

The full pre-typed verbiage is:
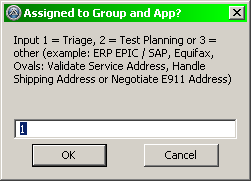
Step 11: Type in either 1 or 2 or 3. Default is 1.
1 = Triage, 2 = Test Planning, 3 = other (for the defects which testing handles directly with external systems like ERP EPIC [SSR and NSS], OVALS [VSA, NE911, HSA], Equifax [The credit rating in CRM doesn’t match data sheet])
NOTE: Triage will always be opened as defects, so for end of a release testing, you need to change it MANUALLY to an issue before submitting.
Test Planning will always be opened as an Issue
Other will always be opened as a defect
Step 12: Type in either ERP EPIC (SAP) or Equifax or OVALS NSP. Default is ERP EPIC (SAP).
NOTE: TRY NOT MAKE ANY TYPING MISTAKES HERE. The program will check, however again alphabet CAPITALIZATION is your responsibility
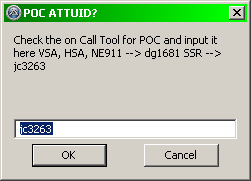
This window below ONLY APPEARS if you choose 3 in Step 10 above.

Step 13: Type in either jc3263 for OVALS or dg1681 ERP EPIC. Default is jc3263.
For Equifax, please look at the on call list.
This ONLY APPEARS if you choose 3 in Step 10 above.
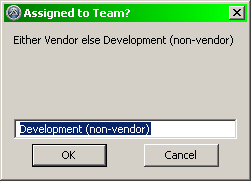
Step 14: Type in either Development (non-vendor) or Vendor. Default is Development (non-vendor).
This ONLY APPEARS if you choose 3 in Step 10 above.
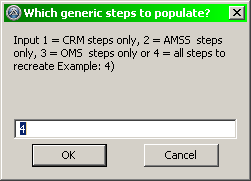
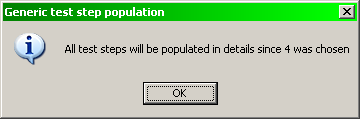
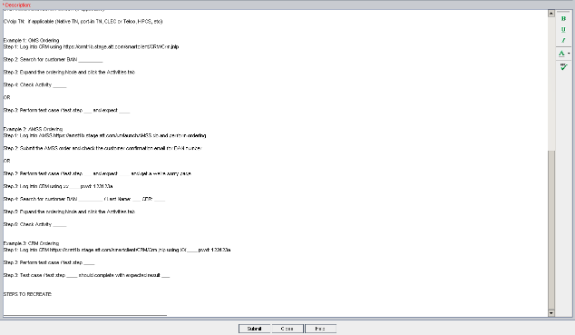
Step 15: Select 1, 2, 3, or 4 for the generic template pre-population of app specific / all generic defect recreation steps. Default is 4, to populate all the CRM AMSS OMS steps.
Step 16: Click OK to dismiss the message. Since R10, we now have 10 PMT codes. Default is 6 (for Ordering = 324784)
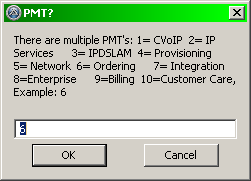
Program
|
Test Area:
|
PMT:
|
1
|
CVoIP
|
324552
|
2
|
IP Services
|
324669
|
3
|
IPDSLAM
|
324671
|
4
|
Provisioning
|
324715
|
5
|
Network
|
324731
|
6
|
Ordering
|
324784
|
7
|
Integration
|
324797
|
8
|
Enterprise
|
324823
|
9
|
Billing
|
325006
|
10
|
Customer Care
|
325410
|
Step 17: Click OK to dismiss the message. MAKE SURE YOU HAVE THE NEW
DEFECT WINDOW OPEN, ready and activated as soon as AFTER you click the OK
button.
Ready to populate defect?
Please ensure that the new defect window is opened, non-maximized and active. DO NOT DO ANYTHING ELSE WHILE THE SCRIPT POPULATES! You may press ESC to exit, Pause to Pause the script

Step 18: Click OK to dismiss the message.
NOTE: This ONLY happens if you either have not opened the New Defect window, else you have it open but not active. Please get ready in 5 seconds or less as soon as you click OK to dismiss as the script will try to discover your “New Defect” Window.
Once my script starts, DO NOT PLAY WITH YOUR MOUSE, DO NOT SURF THE WEB, DO NOT TOUCH ANYTHING UNTIL A HARD BREAK CHECK POINT APPEARS FOR ANY ERRORS THROWN BY QC

Step 19: My script will check and catch for any of the variables filled in and incase if QC still doesn’t like it for some reason. As per screen instructions, please manually correct it and then ensure that the cursor is in the current errored out text box so that the script can continue moving to the next field accurately.

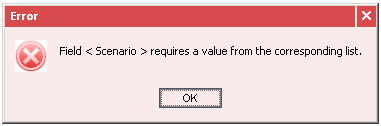

Then it means that QC doesn’t understand your scenario name and you then need to search for it MANUALLY. And after you have the right scenario in, make sure the cursor is in SCENARIO text box, then click OK on the next message box.
Step 20: This is the end of the program, a generic template of steps from earlier selection to recreate will be dumped into the description along with needed important data like generic BAN Number, CRM ID, Customer address etc.


Comments
Post a Comment